By now most teachers have heard of Kahoot and have played at least one Kahoot with their class. Students and teachers enjoy the fast-paced and energetic nature of the game. But Kahoot also has two features that are often overlooked by teachers and therefore are underutilized as formative assessment tools. These two features are downloading the results of a quiz and ghost mode.
After the class plays a Kahoot together the teacher can download a spreadsheet of each student's responses to the questions. This speadsheet lets the teacher know how well each student performed on the task. This data can be used in flexible grouping during the week. A great tool for creating flexible groups from assessment data is the one created by Jen Roberts.
Students are also able to replay a quiz in Ghost mode which allows the class to compete against their previous score. When students respond they will see ghost characters of their previous responses occur in real time along with their current responses. The goal is for the class to out perform their previous score. I find that Ghost mode works best when following up a Kahoot that is used as a pretest. If used in this way, students can really see how much they have improved.
Finally, Kahoot has added a new type of question called Jumble. This type of question requires students to put information in order instead of responding with one correct answer. You can read the blogpost from Kahoot here.
Tuesday, January 17, 2017
Fun Formative Assessment Tools: Quizlet Live
Quizlet Live is the new game feature from the longtime flash card site Quizlet. Any set of flash cards with at least twelve terms can be turned into a Quizlet Live game. The goal of the game is for teams to match twelve terms to their definitions in a row. Teams are assigned randomly and if a team incorrectly matches one of the items then their score resets to zero.
What can a teacher learn from a Quizlet Live game? The first information a teacher gets is being able to hear the conversation that students have with each other. This informal method of assessment can help the teacher identify misconceptions students may still have about a topic. The second information that a teacher receives is after a game Quizlet identifies which terms and definitions the class did well on and which were still an issue. Therefore, Quizlet Live primarily gives the teacher whole class data on a given topic.
On a practical note, I usually use Quizlet Live when I want students to get up and move. I have also tried a version where students are formed into teams but they are not allowed to move near the other members on their team. The students found this slightly frustrating because they realized that they had to truly rely on the knowledge of their teammates. Too often a quick and knowledgable student is able to direct the other members on their team to the correct answer.
To sum up, Quizlet Live is a helpful and fun way for students to practice the information they are learning in class. It gets students up and out of their seats while interacting with other students. On the down side, the teacher only gets whole class feedback and one smart student can take over a team.
What can a teacher learn from a Quizlet Live game? The first information a teacher gets is being able to hear the conversation that students have with each other. This informal method of assessment can help the teacher identify misconceptions students may still have about a topic. The second information that a teacher receives is after a game Quizlet identifies which terms and definitions the class did well on and which were still an issue. Therefore, Quizlet Live primarily gives the teacher whole class data on a given topic.
On a practical note, I usually use Quizlet Live when I want students to get up and move. I have also tried a version where students are formed into teams but they are not allowed to move near the other members on their team. The students found this slightly frustrating because they realized that they had to truly rely on the knowledge of their teammates. Too often a quick and knowledgable student is able to direct the other members on their team to the correct answer.
To sum up, Quizlet Live is a helpful and fun way for students to practice the information they are learning in class. It gets students up and out of their seats while interacting with other students. On the down side, the teacher only gets whole class feedback and one smart student can take over a team.
Friday, August 5, 2016
Create an Infographic Instead of a Traditional Syllabus
I sat down at my desk and began looking over my syllabus for my seventh grade English class. I realized that there was way too much text which most parents did not read, and the important stuff I wanted them to know was hidden in that sea of text. I decided that this year I would simplify my syllabus by creating an infographic of the essential points I want to communicate to parents. I then opened up Piktochart, my favorite infographic creation tool, and looked for a template that would fit my information. I did not find a free template that fit my needs, but I did find an infographic in the "Featured Galleries" that I felt I could recreate.
I decided to use Google Draw as my infographic tool. I have struggled before with creating an infographic from scratch, but I knew I could follow a model. A large part of creating an infographic is blocking out spaces using shapes and color. One I blocked out my sections, I added text and images to create this:

At the bottom of the syllabus I plan to include a short url to the traditional syllabus that I usually print out for parents. I am hoping that since my new syllabus is only one page and visually engaging more parents and students will take the time to read it. Below I have included the template I created so that you can use or modify it for your own class.
I decided to use Google Draw as my infographic tool. I have struggled before with creating an infographic from scratch, but I knew I could follow a model. A large part of creating an infographic is blocking out spaces using shapes and color. One I blocked out my sections, I added text and images to create this:

At the bottom of the syllabus I plan to include a short url to the traditional syllabus that I usually print out for parents. I am hoping that since my new syllabus is only one page and visually engaging more parents and students will take the time to read it. Below I have included the template I created so that you can use or modify it for your own class.
Sunday, September 20, 2015
Finding Nonfiction for Use in the Classroom
In the wake of the Common Core Standards, a slew of websites have sprung up to provide teachers with resources to teach nonfiction and make it engaging. In addition, many of these websites have also addressed the different reading levels present in an average classroom. Most of the websites choose and adapt high interest articles that appeared in other new outlets. These web tools have become in invaluable resource for the classroom teacher looking to make nonfiction more engaging and attempting to differentiate nonfiction based on a student’s reading level. When looking for engaging nonfiction to help students increase their reading abilities or to pair with the fiction we are reading, these are the five websites I use in my search.
Newsela
This website is the most popular entry in this category. While not every feature is not free, much of the content is usable without having to pay. Students and teachers can create an account using their Google login credentials. This account gives access the large selection of news articles on Newsela. Students can read the articles and even take quizzes. The primary feature of Newsela is the ability to adjust the Lexile level of the article. This feature allows the teacher or student to differentiate articles for each student in the teacher’s class. Teachers can also pay a fee to have access to data about their students reading abilities and progress on standards.
DailyRead
This website also has high interest articles geared toward students. The articles tend to be short, but teachers and students can adjust the reading level of the article. One feature that makes this web tool unique are the links to articles on the same subject along with that articles reading level. These links allow the reader to go more in depth on the same topic. Each article is also followed by a “Yes/No" poll where students can vote and view the results. Finally, each article has a short response question that students can complete and would function as a great quick write.
The Smithsonian
The Smithsonian offers a suite of resources for kids from kindergarten to high school in English and Spanish. Collectively the resources are known as TTribune which refers to TTJunior for grades K-4, TweenTribune for grades 5-8, TeenTribune for grades 9-12, and TTEspanol for Spanish speaking students. Students can read high interest articles, adjust the reading level, and even answer a critical thinking question. Students can also comment on the article after their comment has been approved by the teacher.
YoungCurrent
This website also collects child-safe content from across the web. While the Lexile level of each individual article can not be adjusted, students are provided with a list of articles at their reading level. They can also practice vocabulary and receive reports about their weekly progress.
Curriculet
Curriculet is better known for being a platform for providing a tool to help teachers create quizzes, questions, and annotation tools for the texts they are reading in class. But they have partnered with USA Today and therefore provide a library of nonfiction articles that can be read through their platform. As of the writing of this blogpost, Curriculet offers a 45-day free trial and then charges money for access to the articles after the trial period.
I don’t use any one of these tools exclusively, although Newsela seems the best match of free and useful. So if you are looking for nonfiction to use in your classroom, or you only know about Newsela and are looking to check out other resources, any of the tools on this list should help.
Tuesday, June 16, 2015
Create a Character Confessional Using Storyboard That
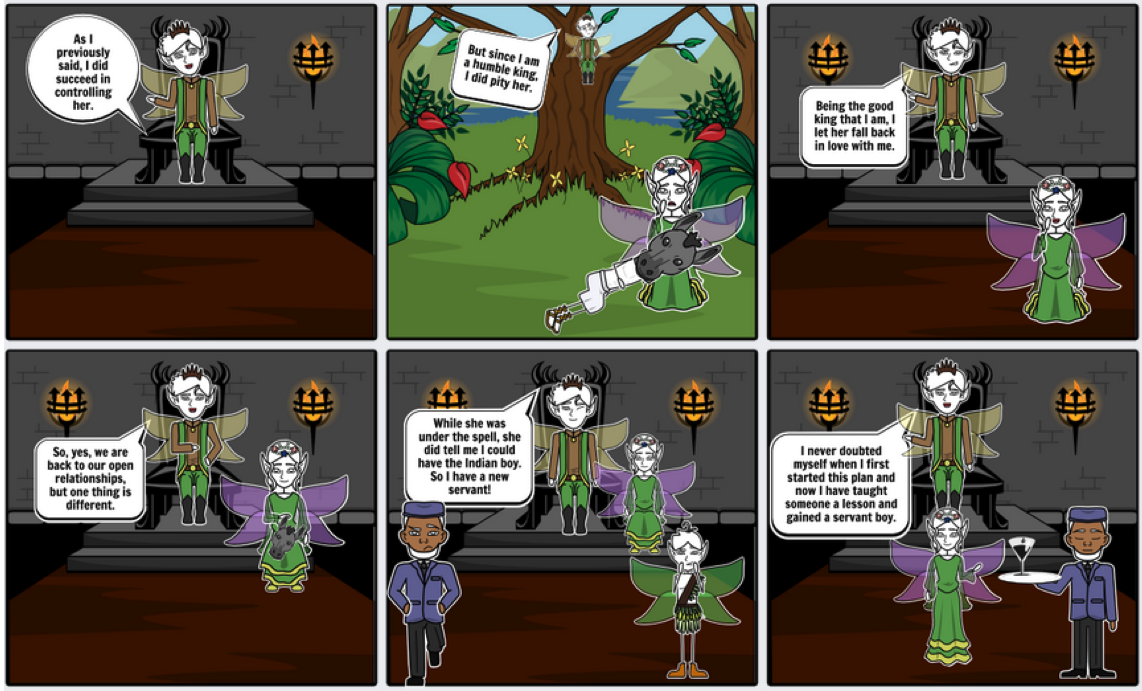
This year I tried a lot of new things: using EngageNY modules, teaching Shakespeare to middle school students, and testing out the web tool Storyboard That. All three of these new experiments came together for me in a performance task for an end-of-the-year unit.
I wanted to expose my 8th grade students to Shakespeare before they reached high school. I decided that the play A Midsummer Night's Dream would be a good choice. It has an engaging plot, a lot of humor, and sets students up to successfully read Romeo and Juliet in 9th grade. Fortunately, EngageNY has a module that focuses on this play, so I didn't have to come up with daily lesson plans. As the unit came to a close, the students were supposed to complete one final performance task: a Character Confessional. Here is the explanation from the EngageNY unit overview:
In this third unit, and after studying the thematic concept of control throughout A Midsummer Night’s Dream, students will write a narrative that will act as a “confessional,” where a character from the play explains his or her attempts to control or manipulate someone else in the play.
A sample narrative Character Confessional can be found here. Since it was one of our final assignments of the year, I decided that the students didn't need to complete another long form piece of writing. Instead, I swapped out the narrative with a comic. A colleague reminded me of how easy it is to create comics using the website StoryboardThat, so students used this tool to create their performance tasks. The original narrative assignment had three parts, so I had students create three sets of six-cell comics for this assignment. The students still had to write in the first person, but they could include various characters and sets from the play. Here is an example of a finished product.
What makes Storyboard That such an excellent tool is the large library they have of characters, scenes, and objects. Students really seemed to enjoy this performance task and it really demonstrated their understanding of a complex theme in this complex and comical play.
Wednesday, May 13, 2015
Tracking Student Projects Using Trello
When students are working on long or short term projects, it is important for the teacher and the students to be able to easily track group progress. Trello does this in a very visual and drag-and-drop fashion. Signing up for Trello is easy, especially if you use the Google sign-in option.
The website uses the metaphor of a board where users create lists and cards. Each list can have multiple cards and users assigned to each card. Once the teacher creates a board and lists, students can easily be searched for and added to the board.
![]() |
| Trello board for my students' screencasting project. |
Currently, my students are working on a video project with multiple steps. I have created a board for the project and a list for each step along the way. After adding my students to the board, they each create a card with explains where they are at on that step and who is in their group. When a group finishes a step in the project they simply drag their card to the next list, which is also the next step in the project. When I login to Trello I am able to see at a glance where each group is at and which groups may need my help to get to the next step.
Before using Trello I would walk around to each group and ask for a status update. This process could be time-consuming and frequently I would get stuck helping one group, only to discover another group needed my attention. Trello boards for each project let me see at a glance track student and group progress and intervene when and where necessary.
Here is a video explaining the basics about how to setup Trello from the Youtube channel InfoSharer.
Monday, February 23, 2015
Gallery "Walk" Using Google Slides and Padlet
I am currently trying one of Engage NY's ELA modules in my English class. In order to build background for the novel for the unit, the module has the students complete a Gallery Walk with primary sources. The sources range from poetry, to images, to quotes from historical figures.
I decided to digitize this process and brainstormed the best solution. I needed to recreate the sticky note aspect of a gallery walk, but also keep all of the student comments organized. I thought about putting the primary sources on a Google Doc and then having students add comments, but this would create too many comments in the margin since each student had to comment on each source.
I decided instead to put each primary source on a Google Slide and create a link to a Padlet wall for that slide. Students spent time reading and observing each slide for the gallery walk, and then clicking on the link to add to the padlet wall for the slide. Students were able to add their comments about the slide and interact with other student ideas. The Padlet wall functioned as the sticky notes for each artifact.
I staggered which slide each student started on in order to cut down on the number of students adding to a Padlet wall at the same time. Once each student had contributed a comment for each artifact of the digital gallery walk, I put students in groups in order to summarize the comments for each slide.
Using Google Slides and Padlet for the gallery walk had a couple of advantages. First, the gallery walk now had a permanent digital home. Students could access the artifacts and comments at a later date. Padlet allows the creator of the wall to make it "View Only," therefore students can access the artifacts and comments at a later date. Second, this activity could be used in a flipped classroom model. Students could complete the Galley Walk at home and then the discussion of the artifacts could happen in class.
Thursday, August 21, 2014
Google Classroom
As the new school begins you may be looking for ways to use Google Drive with your students. Recently Google created a new tool called Google Classroom and made it available to all GAFE accounts. This tool allows teachers to use Google Drive to distribute, collect, and grade assignments using Google tools. If you have ever used Drive before with students, you know that it can be a bit tricky to set up efficiently, especially for non-tech-savvy teachers. Google Classroom makes this much easier and I think it will be very appealing to many teachers. Thankfully Google has made available a lot of tools to help with the setup and use of Google classroom. Below is a link to the help section.
Google Classroom Help
Google has also included a short video that explains the basics of classroom.
Finally, Google made the image below that walks you through 10 best practices when using Drive.
Google Classroom Help
Google has also included a short video that explains the basics of classroom.
In addition many teachers have created walkthroughs. Roger Nixon created the video below that shows the teacher and student view side-by-side.
Wednesday, April 23, 2014
Digital Research Part 2: Instagrok
Instagrok is a research tool that allows students to search trusted websites and provides search results in a visual format. Students can view the websites within Instagrok and star the ones that fit their topic. This web tool also provides a work space for students to begin paraphrasing and analyzing the sources they have chosen.
Students do not need an account to begin using Instagrok, but signing in allows a student to save her work from session to session. If a student already has a Google account, the student can sign in using this account. The opening page has a search box where students can enter a question or the topic they are researching. The results are presented in a visual web of terms and ideas related to their topic. Students can click on any part of the web to begin exploring websites which open up within Instagrok.
If a website provides information that the student is looking for, the student can press the green pin to save website for view later. Instagrok also helps students learn how to evaluate a website. Below each webpage is a "Is this site credible?" button. When students click on the button, they are taken to a list of questions provided by Easybib that help them evaluate the website. The teacher can then choose which questions they want their students to answer about a resource.
All of the websites students pin are saved to a journal. Students can then begin paraphrasing the material to help write the report. Since students have signed in using Google or created an account, the information is saved. This allows students to easily access their information later.
Thursday, April 3, 2014
Digital Research Part 1: Teacher Guided
At a recent Edcamp, I facilitated a discussion about student research online. At the beginning of the session all of the teachers agreed that students have poor research skills. In addition, teachers felt unsure how to help students develop the research skills they needed. Based on the ensuing discussion at the Edcamp and input from other teachers, I think there are at least three ways to help students effectively conduct research online. In this first post I will focus on teacher guided research strategies.
#1 Link List
Perhaps the most basic method is creating a list of links for students to click through. This could be as simple as creating a list of hyperlinks on a Google document. Or it could be something more visually appealing like creating a Blendspace lesson. This website allows a teacher to drag-and-drop resources onto a grid that can be shared with students via a shortened url. Students can then proceed through the lesson one step at a time. I have included a link to video tutorial on how to use Blendspace.
#2 Google Custom Search
Another option is for a teacher to create a Google Custom Search Engine. This Google tool creates a unique search page which limits student searches to a list of websites the teacher chooses in advance. An advantage to this choice is that it allows students to practice their searching skills with a small set of web pages that have been vetted by the teacher. I have included an online tutorial below created by Nancy Minicozzi.
The next blog post will describe how to teach students how to do online research using Instagrok.
Tuesday, November 26, 2013
SAMR: Model, Metaphor, Mistakes
I have been doing a lot of thinking for a presentation on technology in the English Language Arts classroom I am planning for the end of January. In the course of my preparation I came across the SAMR model developed by Ruben N. Puentedura It provides a framework for how technology impacts pedagogy. This YouTube video does a great job briefly explaining each of the stages. As such, the SAMR model can help teachers think about their own implementation of various tech tools in the classroom.
While thinking about the best way to present the model to teachers, I came across a blogpost by Tim Holt that compared the various levels of tech implementation to ordering coffee from Starbucks. A person ordering from Starbucks can simply substitute its coffee for the homemade version or order a Pumpkin Spice Latte, which truly redefines an espresso drink. This metaphor gave me the inspiration to create the following slide (included here as a stand alone image) for my presentation. The comparison is between the drinks a person could order from Starbucks and the coffee he or she could make at home.
But I also came across this blogpost by Catlin Tucker about the limitations of the SAMR model. The mistake would be to assume that the SAMR captures the typical journey of tech implementation in the classroom, beginning with substitution and ending with redefinition. Instead, she suggests, tech implementation involves a transformation to the teacher. Most teachers get connected with other teachers using technology, and through that influence begin to teach with engaging online tools. This observation also fits with the Starbucks metaphor since people also start drinking coffee and espresso drinks by connecting with others who do the same. The SAMR model can help such a teacher evaluate his or her use of a particular tool as technology continues to transform the teacher and classroom.
Finally, this blogpost, especially the comments, made me realize that SAMR can not be read hierarchically or be used as a way to look down on other less tech savvy teachers. At different times in the classroom the substitution level of technology implementation can be just as valuable as the redefinition level. Indeed, a redefinition of a task may later turn out to be less valuable than the original task. In addition, many teachers are already teaching at high levels even before technology tools are used in the classroom.
In conclusion, the SAMR model, in conjunction with the coffee metaphor, can help teachers think about technology implementation in the classroom. But it can not take the place of connecting with other technology using educators and thinking about how these levels impact the high level of teaching that is occurring in so many classrooms across the country.
Monday, November 4, 2013
Chrome Extensions for Educators
One feature that makes the Chrome web browser so powerful is the ability to add extensions. You can find extensions in the Chrome Web Store. They are easily installed with a one button click. Below you will find a list of Chrome Extensions that you can start using right away.
Adblock for Youtube
I was recently observing a lesson by another teacher which used a video from Youtube. Unfortunately, a video ad played first. This extension will solve that problem. It eliminates all video ads from Youtube and allows you to only show the content you intended.
Adblock
Adblock for Youtube
I was recently observing a lesson by another teacher which used a video from Youtube. Unfortunately, a video ad played first. This extension will solve that problem. It eliminates all video ads from Youtube and allows you to only show the content you intended.
Adblock
This is the first extension that I install on any web browser because it is so helpful. It blocks the ads on any web page. In addition and also keeps pop ups from opening in a new window. Therefore you can browse the web without all of the annoying distractions.
One feature I miss from Outlook is desktop notifications. Luckily, there is a Chrome extension that adds this feature to the web browser. Once installed, you need to give the extension permission to access your calendar. Then you will start receiving notifications of your appointments. You can even add events quickly to your Google calendar.
Previously I have written about extensions for Firefox that allow you to download videos for YouTube. I was not aware that the same kind of extension existed for Google Chrome. But this is an extension for Chrome that lets you download a YouTube video and save it to your hard drive. When watching a video, the extension icon changes to a green download arrow. Click on the arrow and choose "add video to video list" and then chose "show video list." From the video list you can download a copy of the video to your hard drive.
Pocket
See something on the web that you want to save for later? Pocket is the extension for you. You can save articles, videos, images, etc. to view later. A great feature of Pocket is it syncs across all web browsers and devices.
Awesome screenshot
We all need to create quick screenshots from time to time. This Chrome extension lets you take a screen shot and edit it all within your browser. You can even save the images to Google Drive.
Picmonkey
This extension lets you grab images from any webpage and instantly begin editing them. Or, using the Chrome app, you can edit pictures from your hard drive. Picmonkey has all of the features you need to quickly edit and share images from the web.
Onetab
Open tabs in Chrome can use up a lot of memory. This extension converts all of the open tabs into a list. You can then open the tabs one at a time or all at once when you need them.
Black Menu for Google
Miss that black bar with all of your Google apps? This extension gives you a one click access to all of your Google services. A great feature of this extension is that you can use it from any webpage.
Split Screen
Ever wanted to have two web pages open in a single window? This extension allows you to type in two URLs and have then open in the same tab. Great viewing assignments and then entering grades into an online grade book.
Clearly
Sometimes you just want to read an article on a webpage and remove all of the distractions. The Clearly extension removes all extra content from a webpage and presents the article in clean, easy-to-read format. If you are an Evernote user, you can also clip the page to your Evernote account.
Now its your turn to supercharge your Chrome web browser. Choose one extension that fits your needs and install it today. Leave any extensions that you love and I forgot to mention in the comments.
This extension lets you grab images from any webpage and instantly begin editing them. Or, using the Chrome app, you can edit pictures from your hard drive. Picmonkey has all of the features you need to quickly edit and share images from the web.
Onetab
Open tabs in Chrome can use up a lot of memory. This extension converts all of the open tabs into a list. You can then open the tabs one at a time or all at once when you need them.
Black Menu for Google
Miss that black bar with all of your Google apps? This extension gives you a one click access to all of your Google services. A great feature of this extension is that you can use it from any webpage.
Split Screen
Ever wanted to have two web pages open in a single window? This extension allows you to type in two URLs and have then open in the same tab. Great viewing assignments and then entering grades into an online grade book.
Clearly
Sometimes you just want to read an article on a webpage and remove all of the distractions. The Clearly extension removes all extra content from a webpage and presents the article in clean, easy-to-read format. If you are an Evernote user, you can also clip the page to your Evernote account.
Now its your turn to supercharge your Chrome web browser. Choose one extension that fits your needs and install it today. Leave any extensions that you love and I forgot to mention in the comments.
Saturday, September 7, 2013
Getting Started with Google Drive
Install the Desktop Application
The beauty of Google Drive is your files do not have to only exist on the web. By installing Google Drive for Windows or Mac, you can access your files on your computer without having to open a web browser. The application creates a Google Drive folder on your computer that syncs any files put into it to your web account. This allows you to have drag and drop capabilities for your files. Any changes you make to a file in Google Drive are immediately synced to the web and any computer that has the desktop application installed. In addition, anything you add to a shared folder is immediately updated to all other users who have access to the folder.
Create and Share a New Folder
This is perhaps the easiest thing you can do. Login to the web version of Google Drive. Click on the folder icon with the plus sign and give the folder a name. Then right click on the new folder you created and add the email addresses of the people you want to share the folder with. Each of the recipients will receive an email notifying them that you have shared the folder. Initially the folder will show up in the "Shared with me" drop-down menu. Each recipient can make sure the shared folder shows up in their own drive by clicking on the shared folder and selecting the "Add to my drive" button.
Create Something
Google Drive also includes Google's full office suite. This includes a word processing application, a spreadsheet creator, a presentation tool, a form creator, and drawing tool. You can immediately begin creating an office document without needing to open Microsoft's Office Suite. Once the document is created you can work on it wherever you have an internet connection. Documents can be shared with others and can be edited by more than one person- even at the same time.
Experiment
Finally, take time to experiment and discover new features yourself. Google Drive is a pretty powerful online environment that Google is constantly updating and adding features to. If you are looking for other things to try you can visit this website and try some of the tips and tricks mentioned.
Sunday, August 11, 2013
Starting the Year Off Right: Parent Communication
Consistent and relevant parent communication is essential for a good school year. Luckily, there are many great tools that make communicating with parents relatively easy. First, Remind101 provides a free and safe way for teachers to communicate with students and parents. After signing up for a free account, you create your classes. Remind101 then provides you with a phone number and a separate code for each class. Parents and students simply send a text message with the code to the number given by Remind101. They are then subscribed to any messages you send out for that class. Parents and students can also signup for email updates, but this is not as obvious. If you click on the print button on the left hand side of the screen, it will create a PDF with the instructions for signing up for text messages and email messages. Now you are ready to send out alerts to parents and students. Just click on a class, type a message, and then hit send. It is blasted out to everyone who is subscribed. You can even tweet the message to a class Twitter account.
Google also provides tools that help with parent communication. Google Voice is a web service that allows you to create a phone number that anyone can call or text message. When parents call the number they can leave a message, when is then transcribed to text and sent to your email. This allows parents to contact you easily while maintaining your privacy. Gmail is also an excellent way to keep in contact with parents. At the beginning of the year, have parents provide you with an email address. Then create a contact list with the emails. Now you can send out messages to parents with one click of a button.
Class websites are an important tool for keeping parents informed. My school uses the free web service Schoolloop for our school website. I put up basic class information and I also post our class agenda online for any students who are absent.
A class blogger is another way to give parents a window on what is happening in the classroom. Each week assign one student to create a short blog post about what they learned that week. This way parents can check in and see what is happening in class from a student's perspective. This also provides accountability for the student whose turn it is to blog that week. Online blogging services for students like Kidblog make this easy.
In addition, learning management systems like Edmodo are an easy way to extend your class outside of its four walls. Students can help each other, ask questions, and even complete assignments from home. Edmodo also provides a code for parents so that they can stay involved with their child's online work.
Finally, and most importantly, don't pass up opportunities to meet with parents face-to-face. Technology can make you more available, but a live meeting makes you more personal.
Google also provides tools that help with parent communication. Google Voice is a web service that allows you to create a phone number that anyone can call or text message. When parents call the number they can leave a message, when is then transcribed to text and sent to your email. This allows parents to contact you easily while maintaining your privacy. Gmail is also an excellent way to keep in contact with parents. At the beginning of the year, have parents provide you with an email address. Then create a contact list with the emails. Now you can send out messages to parents with one click of a button.Class websites are an important tool for keeping parents informed. My school uses the free web service Schoolloop for our school website. I put up basic class information and I also post our class agenda online for any students who are absent.
A class blogger is another way to give parents a window on what is happening in the classroom. Each week assign one student to create a short blog post about what they learned that week. This way parents can check in and see what is happening in class from a student's perspective. This also provides accountability for the student whose turn it is to blog that week. Online blogging services for students like Kidblog make this easy.
Finally, and most importantly, don't pass up opportunities to meet with parents face-to-face. Technology can make you more available, but a live meeting makes you more personal.
Thursday, August 1, 2013
Using TED talks and iTunes U to Develop Students' Listening Skills
One of the goals set out in the Common Core standards is to make students better and more discerning listeners. More specifically, the standards require students to "Evaluate a speaker's point of view, reasoning, and use of evidence and rhetoric" (CCRA.SL.3). This standard considered in isolation can appear daunting. Put in exaggerated terms, it would require a regular round of speakers invited into the classroom and/or a heavy dose of student presentations. Both of these options are important in developing students' listening skills, but neither can happen on a consistent enough basis to provide the repeated practice students need to master this standard. But students can receive a steady diet of engaging presentations through online resources like TED.com and iTunes U. In addition, when videos from these online resources are embedded into units focused on Big Ideas or Big Questions, students are motivated to do the hard work it takes to delineate a speaker's reasoning and evaluate the speaker's point of view on a topic.
First, TED.com and iTunes U are both excellent repositories of video presentations on a wide range of topics from a diversity of speakers. TED.com is best for concise and polished presentations since each speaker is only allowed eighteen minutes to communicate a message, a format that forces each speaker to narrow the topic. Anyone can stream the video directly from the TED site or download it for offline use. There are many lists available online of TED videos that are good for classroom use. In the last year, TED.com has also developed TEDEd, which is a collection of short, captivating videos teachers can build lessons around. iTunes U is another source of videos for classroom use. As the name suggests, it requires iTunes to access the videos and is generally geared towards upper academic levels. But if you are teaching Night by Elie Wiesel, the interviews available here will definitely supplement your unit. Of course, Youtube deserves a mention, especially if your district has unblocked Youtube for schools.
Second, videos discovered in the ways described above are most effective when embedded into units that focus on a particular novel, theme, big idea, or big question. This gives students a reason to watch the video and do the hard work it takes to understand the message that is being communicated. In this way, the videos, along with the fiction and non-fiction being read in class, become another source for considering the big idea or theme of the unit. For more information about designing units based on big questions, I would recommend Jim Burke's book What's the Big Idea? The first chapter of the book can be found here.
This year I plan on incorporating more video into my big question units to provide my students with more opportunities to practice their listening skills and to provide captivating sources for considering answers to our collective questions. On a side note, I am still trying to develop a helpful graphic organizer for delineating and evaluating a speaker's point of view, so if anyone out there has some ideas, please let me know.
Monday, July 22, 2013
Postach.io: Blogging via Evernote
I am a huge Evernote fan and I find myself using it in more and more ways. I was excited to discover that I can use my Evernote account to create and post to a personal blog. The website Postach.io (yes that is the website's name) allows you to use your Evernote account as a blogging platform. Postach.io creates blog posts from notes in your Evernote account.
After signing up for a free account, you can start a new blog by clicking "Create New Site." You begin by creating a sub-domain, a title, author bio, and description for your new blog. The next step is to choose a notebook in your Evernote account to associate with your new website. By default, Postach.io creates a notebook entitled "Postach.io," but you can choose any notebook you desire. Notes within this notebook become blog posts when the tag "published" is added to the note. Finally, you can link various social accounts with Postach.io, enter a Google Analytics code, use Disqus for comments, identify if you want to use Markdown or not, and choose a theme for you blog.
Now your website is ready to go. Simply create notes within the notebook you chose and tag them "published" and they will appear on your site. Pretty much anything you can include in an Evernote note can be published on your blog. There are differences between the web, mobile, and desktop versions of Evernote, so you may find certain tasks and editing are easier on one platform compared to the other.
With so many tools out there, I try to consolidate as much as possible. While the blogging platform is simple, it gets the job done for me and makes my Evernote account that much more useful. If you have an Evernote account and have not started blogging, Postach.io may be the tool that gets you started.
Monday, October 29, 2012
Teaching Channel
This past weekend I attended the Fall CUE (Computer Using Educators) conference in the Bay Area. One of the sessions I participated in was on the topic of the Common Core Standards. One of the presenters mentioned an excellent online resource to help you and the teachers at your school prepare for the shift to the Common Core: Teaching Channel. The website is full of video lessons and tutorials along with the teacher handouts and resources mentioned in each video. In essence, it is a free professional development library totally devoted to the Common Core Standards.
If you click on any video, you are immediately taken to a separate page where you can view the lesson or tutorial of your choice. Along with the video player, each video lists the lesson objective, length, questions to consider, and the Common Core Standard related to the resource. Below the video player you will find any supporting materials mentioned and a discussion thread about the video. Currently users are not allowed to download videos, but you can share them via popular social networks, embed them on other websites, or send a link to the video through email.
One of the best features of Teaching Channel is the ability to sort the videos by subject, grade, and topic. As a middle school English Language Arts teacher, I was able to find fifty videos related to my subject and grade level. The videos range in length from two minutes for quick lesson tips or up to thirty minutes for larger topics.
Teaching Channel is a great resource for department collaboration time. The video lessons and tutorials are not presented in a "this-is-how-to-teach-it-correctly" tone, but instead are starters for discussion and fuel for your own ideas. If you are looking for a way to learn more about the Common Core or want to view lessons in action, visit this feature and content rich online professional development resource.
Sunday, October 14, 2012
Quizlet: Creating Amazing Flashcards
Quizlet is a flashcard site that makes it easy to study any subject for free. This web tool allows a user to create a flashcard set for any subject and immediately begin studying terms and definitions. The power of Quizlet is how easy it is to create a flashcard set and the features available once the set is created.
To begin with, you don't even have to create an account to preview Quizlet's features. On the front page of the website you can test drive its features using one of the sample sets. The most basic mode allows the user to quickly flip through the terms and definitions and begin learning the content. Each set gives you the option of viewing the term first, or both sides at the same time if you are running through the cards for the first time.
But it is the other features that make Quizlet such a powerful tool for teachers and students. The first feature is a "Speller" mode, which allows the user to listen to a term and then type in the correct spelling. Next is the "Test' mode which assesses the users knowledge of the set with fill in the blank, multiple choice, or True and False formats. "Learn" mode is similar to "Speller" mode without the audio pronunciation. Finally, there are two game modes called "Scatter" and "Space Race." The first game scatters the terms and definitions across the screen and the user has to drag the correct term to its corresponding definition. The second game is a timed race where the user has to type in the term before the definition moves across the screen. The amazing thing is that all of these modes are available as soon as a set is created.
Creating a flashcard set is dead simple. Type the term in the first box and Quizlet will even offer to provide a list of definitions to choose from. Flashcard sets can be created in a variety of different languages and foreign language study is one of the top uses of the website. If you are studying a very common topic, such as SAT vocabulary prep, you search for sets created by other users. Frequently other users have already created a set for the topic that the user needs to master.
Quizlet has a few advanced features. You can add images to a flashcard set by searching through the free images available on the site, or you can upload your own images by signing up for a Plus account for fifteen dollars a year. Quizlet also allows you to create different classes and share flashcard sets with particular groups of students. User created sets can also be embedded on a website or blog.
I have used Quizlet for many years and I am constantly finding new uses for it. I have included a sample set I created for my students. So sign up for a free account and have fun creating flashcard sets for you or your students.
To begin with, you don't even have to create an account to preview Quizlet's features. On the front page of the website you can test drive its features using one of the sample sets. The most basic mode allows the user to quickly flip through the terms and definitions and begin learning the content. Each set gives you the option of viewing the term first, or both sides at the same time if you are running through the cards for the first time.
But it is the other features that make Quizlet such a powerful tool for teachers and students. The first feature is a "Speller" mode, which allows the user to listen to a term and then type in the correct spelling. Next is the "Test' mode which assesses the users knowledge of the set with fill in the blank, multiple choice, or True and False formats. "Learn" mode is similar to "Speller" mode without the audio pronunciation. Finally, there are two game modes called "Scatter" and "Space Race." The first game scatters the terms and definitions across the screen and the user has to drag the correct term to its corresponding definition. The second game is a timed race where the user has to type in the term before the definition moves across the screen. The amazing thing is that all of these modes are available as soon as a set is created.
Creating a flashcard set is dead simple. Type the term in the first box and Quizlet will even offer to provide a list of definitions to choose from. Flashcard sets can be created in a variety of different languages and foreign language study is one of the top uses of the website. If you are studying a very common topic, such as SAT vocabulary prep, you search for sets created by other users. Frequently other users have already created a set for the topic that the user needs to master.
Quizlet has a few advanced features. You can add images to a flashcard set by searching through the free images available on the site, or you can upload your own images by signing up for a Plus account for fifteen dollars a year. Quizlet also allows you to create different classes and share flashcard sets with particular groups of students. User created sets can also be embedded on a website or blog.
I have used Quizlet for many years and I am constantly finding new uses for it. I have included a sample set I created for my students. So sign up for a free account and have fun creating flashcard sets for you or your students.
Sunday, August 26, 2012
Downloading Videos
I frequently come across videos on websites that I think would make a great part of a lesson, but the website is blocked by an internet filter (i.e. YouTube). When I come across this situation, I turn to a very helpful Firefox add-on called "Video Downloadhelper." This little utility adds the ability to download to your hard drive most videos on webpages.
The add-on automatically detects when a video is present, and the three colored spheres in the logo begin to rotate. Just click on the animated spheres and you will see the name of the video file playing. Click on the file name, and the video will immediately begin downloading. On sites like YouTube, you will even be presented with different file types and video qualities for the same clip. You can then put the video file on a flash drive and use it as part of your lesson.
Video Downloadhelper
Wingclips
Video clips can often serve as great introductions to units, concepts, or literary themes. Unfortunately, it is difficult to locate quality clips that meet the needs of the lesson you might be teaching on a given day. That is where Wingclips comes in.
This website has a large collection of clips from popular movies, past and present, arranged by theme. When you visit the website, one of the first things you will see is a slider on the left-hand side of the webpage. Simply drag the slider up and down to locate the theme you need. Once you click on the theme, you will be taken to a list of clips that fit that topic. Each clip is playable and can be viewed full screen. Downloads of clips can be purchased on the site. But for most classroom needs, simply playing the clip in order to stimulate discussion about a topic is probably enough.
So the next time you are looking for a video clip to help your students engage in a topic, give Wingclips a try.
Subscribe to:
Posts (Atom)